


INGREDIENTS
Ingredients for the croissant dough
500 Gr. French Type 55 flour or unbleached all-purpose flour / plain flour (extra for dusting)
140 Gr. water
140 Gr. whole milk (you can take it straight from the fridge)
55 Gr. sugar
40 Gr. soft unsalted butter
11 Gr. instant yeast
12 Gr. salt
Other ingredients
280 Gr. Cold butter for laminating
280 g cold unsalted butter for laminating
1 egg + 1 tsp water for the egg wash
INSTRUCTIONS
I do this part in the evening, the day before baking.
Combine the dough ingredients and knead for 3 minutes, at low to medium speed, until the dough comes together.
Shape the dough like a disc, not a ball, before you refrigerate it, so it will be easier to roll it into a square shape the following day.
Place the disc on a plate, cover with clingfilm and leave in the fridge overnight.
Laminating the dough
Cut the cold butter (directly from the fridge) lengthwise into 1,25 cm thick slabs.
Arrange the pieces of butter on waxed paper to form a square of about 15 cm x 15 cm. Cover the butter with another layer of waxed paper and with a rolling pin pound butter until about 19 cm x 19 cm. Trim / straighten the edges of the butter and put the trimmings on top of the square. Now pound lightly until you have a final square of 17 cm x 17 cm. Wrap in paper and refrigerate the butter slab until needed.
The last time I used an IKEA freezing bag measuring 17 X 17 cm. It is an easy way to laminate the butter as is first perfectly into the bag, so you have an even butter thickness.
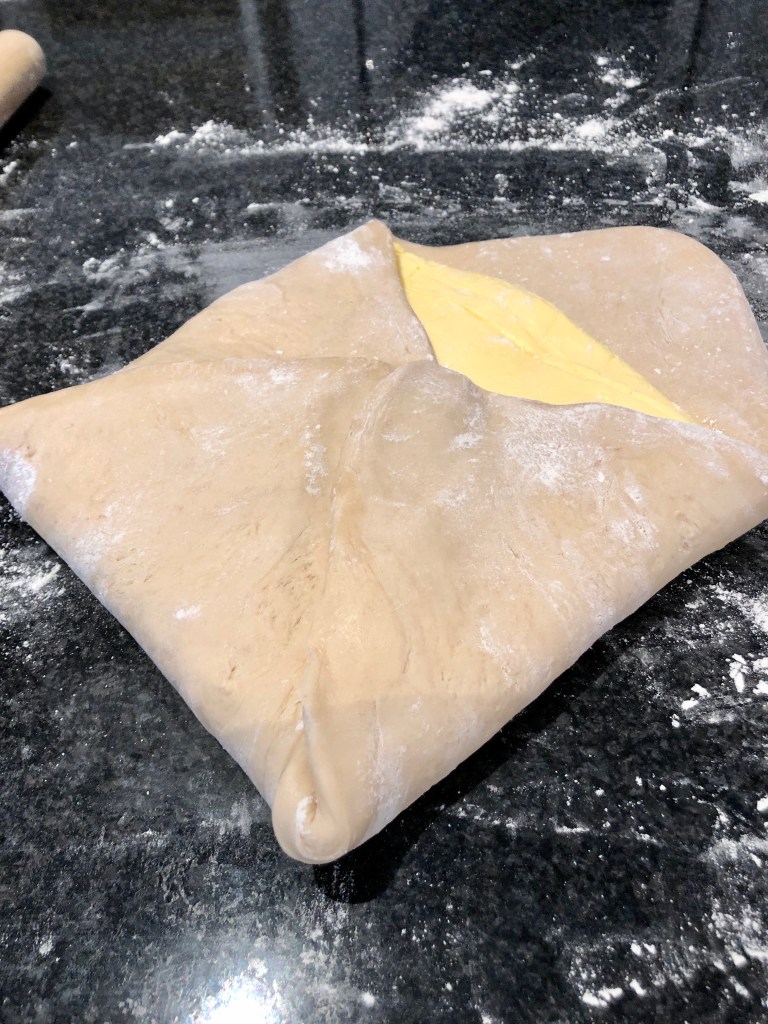
Take the dough out of the fridge. With a rolling pin and roll out the dough disc into a 26 cm x 26 cm square. Try to get the square as perfect as possible and with an even thickness. Get the slab of butter from the fridge. Place the dough square so one of the sides of the square is facing you and place the butter slab on it with a 45 degree angle to the dough so a point of the butter square is facing you.
Fold a flap of dough over the butter, so the point of the dough reaches the centre of the butter. Do the same with the three other flaps. The edges of the dough flaps should slightly overlap to fully enclose the butter. With the palm of your hand lightly press the edges to seal the seams.
Now the dough with the sealed in butter needs to be rolled out. With a lightly floured rolling pin start rolling out, on a lightly flour dusted surface, the dough to a rectangle of 20 x 60 cm. Start rolling from the center of the dough towards the edges, and not from one side of the dough all the way to the other side. This technique helps you to keep the dough at an even thickness. You can also rotate your dough 180 degrees to keep it more even, because you tend to use more pressure when rolling away from you than towards yourself. You can use these techniques during all the rolling steps of this recipe. Aim at lengthening the dough instead of making it wider and try to keep all edges as straight as possible.
Fold the dough letter style, cover with clingfilm and refrigerate for 30 minutes (fold one third of the dough on top of itself and then fold the other side over it).
Repeat the rolling and folding two more times (ending up with 27 layers of butter in total), each time rolling until the dough is about 20 cm x 60 cm.
After each fold you should turn the dough 90 degrees before rolling again. The open ‘end’ of the dough should be towards you every time when rolling out the dough. After the second turn, again give it a 30 minute rest in the fridge. After the third turn you leave the dough in the fridge for 30 minutes.
Then
Take the dough from the fridge. Lightly flour your work surface. Now very gently roll the dough into a long and narrow strip of 20 cm x 110 cm. If the dough starts to resist too much or shrink back during this process you can fold it in thirds and give it a rest in the fridge for 10 to 20 minutes before continuing. Do not fight the dough, when the dough refuses to get any longer, rest it in the fridge! It is such a shame to ruin two days of work.
When your dough has reached its intended shape, carefully lift it a few centimetres to allow it to naturally shrink back from both sides. This way it will not shrink when you cut it. Your strip of dough should be long enough to allow you to trim the ends to make them straight and still be left with a length of about 100 cm.
For the next stage you will need a tape measure and a pizza wheel. Lay a tape measure along the top of the dough. With the wheel you mark the top of the dough at 12,5 cm intervals along the length (7 marks total). Now lay the tape measure along the bottom of the dough and make a mark at 6,25 cm. Then continue to make marks at 12,5 cm intervals from this point (8 marks total). So the bottom and the top marks do not align with each other and form the basis for your triangles.
Now make diagonal cuts starting from the top corner cutting down to the first bottom mark. Make diagonal cuts along the entire length of the dough. Then change the angle and make cuts from the other top corner to the bottom mark to create triangles. Again repeat this along the length of the dough. This way you will end up with 15 triangles and a few end pieces of dough.
Using your pizza wheel, make 1.5 cm long notches in the center of the short side of each dough triangle.
Now very gently elongate each triangle to about 25 cm. This is often done by hand, but we have found that elongating with a rolling pin, very carefully, almost without putting pressure on the dough triangle, works better for us. You can try both methods and see what you think gives the best result.
After you cut a notch in the middle of the short end of the triangle, try and roll the two wings by moving your hands outwards from the centre, creating the desired shape with a thinner, longer point. Also try and roll the dough very tightly at the beginning and put enough pressure on the dough to make the layers stick together.
Preheat the oven at 200 Celsius.
Let the croissant rest for two hours in a draft-free environment. They will puff up considerably.
Right before baking, give the croissants a thin coat of egg wash. Bake the croissants for 20 minutes.
Take out of the oven, leave for a few minutes on the baking sheet, then transfer to a cooling rack.

Leave a comment